How to: Upgrade Android to Android 4.0 Ice Cream Sandwich?
Introducing Android 4.0
Well known mobile operating system called Android especially designed for touchscreen mobiles is now available in “Android 4.0 Ice Cream Sandwich (ICS)” and most of the folks out there are trying to upgrade their Android devices to Android 4.0 Ice Cream Sandwich. Because it’s the latest version of Android and after the release of it, the application developers are also trying to make changes in their applications to make them supported in Android 4.0 Ice Cream Sandwich.
Who don’t want to upgrade their Android devices do you? Of course not… As it’s the latest version for touchscreen phones, tablets and more… It builds on the things that people love most about. Easy multitasking, notifications, customizable home screens, re-sizable widgets, and deep interactivity. It adds powerful latest ways of communicating and sharing.
How Great is the Performance of Android 4.0 Ice Cream Sandwich?
Let me explain a little bit more about the performance of Android 4.0. Across all types of content, the Android Browser offers improved page rendering performance via the updated versions of WebKit core and the V8 Crankshaft compilation engine for JavaScript. In the Android 4.0 the browser showed an improvement for about 220% over the Android 2.3 as compared with V8 Benchmark Suite and 35% in the SunSpider 9.1 JavaScript Benchmark. When Android 4.0 RUN on Galaxy Nexus device, it showed a browser improvement for about 550% in the V8 benchmark and nearly 70% in the SunSpider benchmark.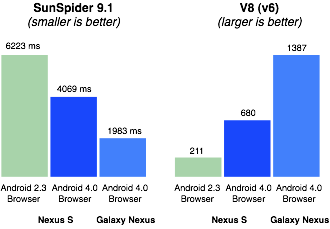
How Do I Upgrade my Android to Android 4.0 Ice Cream Sandwich in HTC HD2?
You’ll be able to upgrade your Android to Android 4.0 Ice Cream Sandwich in HTC HD2, just by following the steps below:
1. All you need to do is to download Android 4.0 ICS by clicking here. And rename the .zip file as update.zip.
2. Now upload the downloaded .zip file in the root directory of your Android phone via USB. Don’t place the update.zip file inside of any folder however place it out the all folder which usually termed as “Root Directory”.
3. Turn off you mobile and power on it and don’t let go power button followed by volume down.
4. Use volume down button to go down to 8. AD Recovery.
5. Then press call button.
6. ClockworkMod Recovery will be loaded then.
7. Select wipe data/factory reset. (You can skip this step if upgrade from same ROM)
8. Select Yes — Delete all user data.
9. Select wipe cache partition. (You can skip this step if upgrade from same ROM)
10. Select Yes — Wipe Cache.
11. Go to install zip.
12. Select Yes – Install your zip file.
13. Press power button to go back.
14. Then reboot your phone.
15. Android 4.0 ICS OS will be loaded then.
That’s it..
How Do I Upgrade Android 4.0 Ice Cream Sandwich in Sony Mobiles?
It’s quite easy to update Sony mobiles. Sony Xperia updates is a simple way to update your Sony mobile phones using a web browser. And it’s the same way to update as we do in Windows, PC, and MAC. To check the Android update for your Sony mobile follow these of the following steps:
1. Go to sonymobile.com
2. Click Software from top menu and then Find an Update
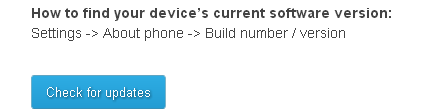
3. Select your mobile phone and you can see about current software’s version:
Settings -> About phone -> Build number / version
Settings -> About phone -> Build number / version
4. However, by clicking the button check for updates will output you the new update about your Sony mobile phone if available.
5. Now, connect your mobile phone with computer via USB cable. Xperia updates will identify and find searches for new software if found you will see the update button like:
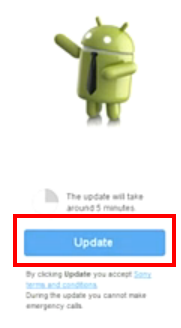
6. Click the button Update to start the process of updating. At this time the update will downloaded to your Sony mobile phone and when the download is completed you will have to disconnect the USB cable at this point.
7. Now, your mobile will automatically restarted…
8. At the top you’ll receive a notification if any of the update is found, pull down the notification bar and click the new update.
9. You will be promoted to update center to learn more about the update, what are the new features are coming in this update and more. Click the button Download to download the update in your phone.
10. Again click the notification to install the update. Click the button Install and confirm the install by clicking the notification in popup message. At this time your mobile will restarted again.
That’s all, Now you are ready to go with your Sony Mobile .
Updated 23 June, 2013
How to Upgrade Galaxy Tab 7 plus? For @Wina
You can simply upload the .zip file in your SD card and run the upgrade process, I hope there should not be any problem while upgrading. The all data will remain safe in the SD card because Android version going to upgrade not your SD card itself. 

Image Source Phandroid.com
So, let me tell you what should you do for Galaxy tab 7 plus to upgrade. Follow these steps:
1. Upload .zip file in your SD card
2. Switch off your Galaxy Tab Plus
3. Enter Recovery, Hold the volume UP button along with Power Button
4. When the TAB completely turns ON, release power button (But don’t let Volume UP Button go)
5. Will Enter Recovery
5. Select install update from SD card
6. Look up for the .zip file that you had uploaded and select it holding the power button
7. REBOOT, when finish.
If you want to update any other mobile phone feel free to comment below…